7.3 KiB
Writing apps that use dex
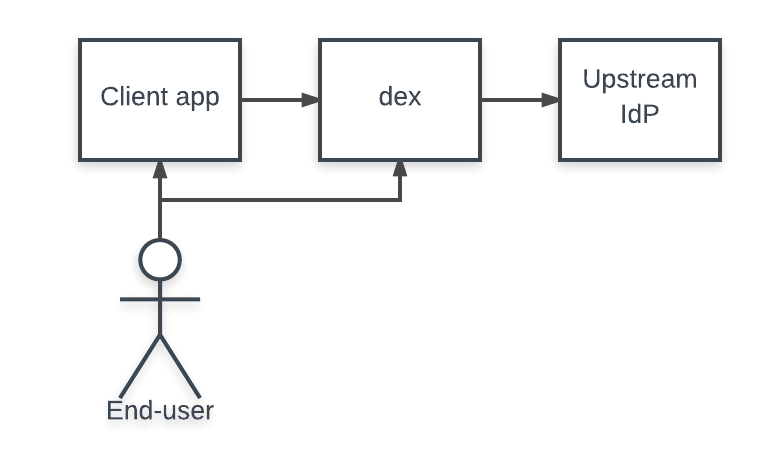
Once you have dex up and running, the next step is to write applications that use dex to drive authentication. Apps that interact with dex generally fall into one of two categories:
- Apps that request OpenID Connect ID tokens to authenticate users.
- Used for authenticating an end user.
- Must be web based.
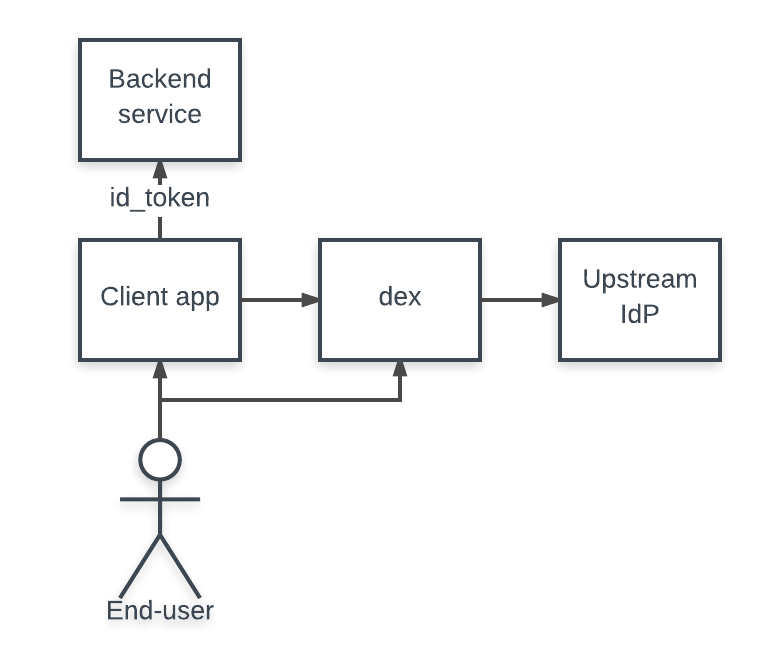
- Apps that consume ID tokens from other apps.
- Needs to verify that a client is acting on behalf of a user.
The first category of apps are standard OAuth2 clients. Users show up at a website, and the application wants to authenticate those end users by pulling claims out of the ID token.
The second category of apps consume ID tokens as credentials. This lets another service handle OAuth2 flows, then use the ID token retrieved from dex to act on the end user's behalf with the app. An example of an app that falls into this category is the Kubernetes API server.
Requesting an ID token from dex
Apps that directly use dex to authenticate a user use OAuth2 code flows to request a token response. The exact steps taken are:
- User visits client app.
- Client app redirects user to dex with an OAuth2 request.
- Dex determines user's identity.
- Dex redirects user to client with a code.
- Client exchanges code with dex for an id_token.
The dex repo contains a small example app as a working, self contained app that performs this flow.
The rest of this section explores the code sections which to help explain how to implementing this logic in your own app.
Configuring your app
The example app uses the following Go packages to perform the code flow:
First, client details should be present in the dex configuration. For example, we could register an app with dex with the following section:
staticClients:
- id: example-app
  secret: example-app-secret
  name: 'Example App'
  # Where the app will be running.
  redirectURIs:
  - 'http://127.0.0.1:5555/callback'
In this case, the Go code would be configured as:
// Initialize a provider by specifying dex's issuer URL.
provider, err := oidc.NewProvider(ctx, "https://dex-issuer-url.com")
if err != nil {
    // handle error
}

// Configure the OAuth2 config with the client values.
oauth2Config := oauth2.Config{
    // client_id and client_secret of the client.
    ClientID:     "example-app",
    ClientSecret: "example-app-secret",

    // The redirectURL.
    RedirectURL: "http://127.0.0.1:5555/callback",

    // Discovery returns the OAuth2 endpoints.
    Endpoint: provider.Endpoint(),

    // "openid" is a required scope for OpenID Connect flows.
    //
    // Other scopes, such as "groups" can be requested.
    Scopes: []string{oidc.ScopeOpenID, "profile", "email", "groups"},
}

// Create an ID token parser.
idTokenVerifier := provider.Verifier(&oidc.Config{ClientID: "example-app"})
The HTTP server should then redirect unauthenticated users to dex to initialize the OAuth2 flow.
// handleRedirect is used to start an OAuth2 flow with the dex server.
func handleRedirect(w http.ResponseWriter, r *http.Request) {
    state := newState()
    http.Redirect(w, r, oauth2Config.AuthCodeURL(state), http.StatusFound)
}
After dex verifies the user's identity it redirects the user back to the client app with a code that can be exchanged for an ID token. The ID token can then be parsed by the verifier created above. This immediately
func handleOAuth2Callback(w http.ResponseWriter, r *http.Request) {
    state := r.URL.Query().Get("state")

    // Verify state.

    oauth2Token, err := oauth2Config.Exchange(ctx, r.URL.Query().Get("code"))
    if err != nil {
        // handle error
    }

    // Extract the ID Token from OAuth2 token.
    rawIDToken, ok := oauth2Token.Extra("id_token").(string)
    if !ok {
        // handle missing token
    }

    // Parse and verify ID Token payload.
    idToken, err := idTokenVerifier.Verify(ctx, rawIDToken)
    if err != nil {
        // handle error
    }

    // Extract custom claims.
    var claims struct {
        Email    string   `json:"email"`
        Verified bool     `json:"email_verified"`
        Groups   []string `json:"groups"`
    }
    if err := idToken.Claims(&claims); err != nil {
        // handle error
    }
}
State tokens
The state parameter is an arbitrary string that dex will always return with the callback. It plays a security role, preventing certain kinds of OAuth2 attacks. Specifically it can be used by clients to ensure:
- The user who started the flow is the one who finished it, by linking the user's session with the state token. For example, by setting the state as an HTTP cookie, then comparing it when the user returns to the app.
- The request hasn't been replayed. This could be accomplished by associating some nonce in the state.
A more thorough discussion of these kinds of best practices can be found in the "OAuth 2.0 Threat Model and Security Considerations" RFC.
Consuming ID tokens
Apps can also choose to consume ID tokens, letting other trusted clients handle the web flows for login. Clients pass along the ID tokens they receive from dex, usually as a bearer token, letting them act as the user to the backend service.
To accept ID tokens as user credentials, an app would construct an OpenID Connect verifier similarly to the above example. The verifier validates the ID token's signature, ensures it hasn't expired, etc. An important part of this code is that the verifier only trusts the example app's client. This ensures the example app is the one who's using the ID token, and not another, untrusted client.
// Initialize a provider by specifying dex's issuer URL.
provider, err := oidc.NewProvider(ctx, "https://dex-issuer-url.com")
if err != nil {
    // handle error
}
// Create an ID token parser, but only trust ID tokens issued to "example-app"
idTokenVerifier := provider.Verifier(&oidc.Config{ClientID: "example-app"})
The verifier can then be used to pull user info out of tokens:
type user struct {
    email  string
    groups []string
}

// authorize verifies a bearer token and pulls user information form the claims.
func authorize(ctx context.Context, bearerToken string) (*user, error) {
    idToken, err := idTokenVerifier.Verify(ctx, bearerToken)
    if err != nil {
        return nil, fmt.Errorf("could not verify bearer token: %v", err)
    }
    // Extract custom claims.
    var claims struct {
        Email    string   `json:"email"`
        Verified bool     `json:"email_verified"`
        Groups   []string `json:"groups"`
    }
    if err := idToken.Claims(&claims); err != nil {
        return nil, fmt.Errorf("failed to parse claims: %v", err)
    }
    if !claims.Verified {
        return nil, fmt.Errorf("email (%q) in returned claims was not verified", claims.Email)
    }
    return &user{claims.Email, claims.Groups}, nil
}

